Showing posts with label vanilla. Show all posts

Tuesday, 11 August 2015

Vintage Victoria Sponge Cupcakes


Hey guys and girls! 

I hope you are all well this evening? 

I'm so sorry that I haven't posted in a while, on any of the pages! Twitter, Facebook, Instagram and on here, but if you pop over to the life page, you can find out on what is taking me so long!

Now, I don't know about you; but the weather has been going up and down like a rocket! What with it being warm one week, blistering hot the week after, then dropping all the way back down into the singles nearly! 

If you have only just got here, we we're just talking about the typical British weather! 


Recipe: 

Start by weighing 2 large eggs, whatever the eggs they come too,
weigh the same for the following ingredients: 

Self Raising Flour
Butter
Caster Sugar

You will also need: 

1 x Punnet of Fresh Strawberries
300ml of Double Cream
1 tsp Vanilla
1-2 tbsp Milk
3 tsp Caster Sugar
1tsp Baking Powder 
Cupcake Cases

Let's get started!

1. Firstly, set your oven to 170 C, 350 F, Gas Mark 4 so it can heat up in the meantime.
You can also lay out the cupcake cases into the tray. 

2. Place the butter and sugar into a bowl and give it a good whisk until the butter goes a bit more pale. Then in a cup, crack open the eggs and give a good beating, once beaten, slowly but gradually add in the eggs a bit at a time. The mix will go all runny and may look curdled, but don't worry!

3. Next, sieve the flour and baking powder together in a separate bowl, once you have done this put it back through the sieve one bit at a time and gradually add it to the egg and butter mixture. I like to mix with a wooden spoon first - Just so none of the flour shoots out!

4. After gradually adding the flour and mixing in between, your mixture should be well incorporated. Once it is add in the milk and the vanilla, then mix again until soft and pale.

5. Spoon the mixture into the cases just below half, don't over fill as they will flood over the cases and we don't want that! Once you have used all the mixture, place into the oven for 10 minutes. After the 10 is up, check the cupcakes if they are still wobbling, leave them in for another 5-10 mins. 

6. Once the timer is up, take them out of the oven and leave them to cool IN THE TRAY.
DO NOT take them out of the tray, as they are still warm and can easily lose their shape. Leave them in until completely cool, then remove.

Topping

If you saw my post for the Vintage Victoria Sponge, the recipe and the guidelines for the fresh cream topping can be found on this post

If you don't want to click the link or don't have time, I have still posted a quick how to below, but it has been taken from the Vintage Victoria Sponge cake post. 

7. Whilst the cake is cooling, place the 300ml of double cream into a bowl, add 3 tsp of sugar and give it a good whisk on a medium - high speed.  
You will soon see the consistency of the cream start to change, keep going until you have soft speaks. Once you get to this stage, place some clingfilm over the top and place into the fridge to keep cool until the cake has fully cooled. 

8. When the cakes are cool, add a dollop of the cream onto each of the cupcakes, then after the strawberries have been washed and the tops are off. You can either cut them in half or place them whole on top of the cupcakes. And there you go! Once the cream is on, be sure to keep them the fridge to save the cream from going off. 

Enjoy!


Thursday, 30 July 2015

21st Cupcake Fit For a King!


Hey everyone!


How are we all doing? 

I understand that I have been a bit quiet recently and yes I do need to post more and I also know that some of the post that will be new today, are actually in fact old - as far as Facebook, Instagram and Twitter go. But if you head on over to Sprinkle, Sparkle and Magic Life there is an update on why I've been so quiet recently. 

But for now, lets take a look at this GIANT cupcake! I do love making them, they're just so fun and wonderful to create!!


I apologise for the photo's I understand that they aren't very good, but believe it or not, this is from my phone and the phone has a better camera than my actual camera...if that just made any sense? 

The above photo is a little 'plaque' that was made, small dint's we're placed around the side to make it have a different effect and look, I was going for a gold coin look. It then was sprayed with silver Shimmer spray and then I carefully painted on the lettering and number :) With vodka and gel colours. 


Close up of that smooth, velvety buttercream! 

The cake was Victoria sponge with raspberry jam and vanilla buttercream in the centre, vanilla buttercream was also swirled on top too! 

Crispy M&M's we're added inside the cake as a surprise and then topped around the cake to give off the effect of sprinkles! The base of the cake was solid blue candy melts with added white chocolate. With the cake placed inside it!

The lettering that you can see on the above photo and the one all the way at the top was a lovely mint green coloured sugarpaste and was made using Windsor's Clikstix's. Which took me some time to get used to at first, but I have sussed out the magic trick now! 


I also made a mini Desperado's beer bottle as asked by the customer. Had carved, then sprayed with gold and silver shimmer spray. and hand painted label! I am so proud and happy on how it turned out. I haven't got a clearer picture I am afraid but will try and find one! 


All in all, what can I say? I just LOVE making the giant cupcakes, they are so fun to create and you can go all out on them! Even though they are still the range in some aspects, they never seem to bore me or fail to make me amazed! 

Speak to you all soon, more blog posts to come!!


Tuesday, 9 June 2015

Vanilla Spice Sugar Cookie Recipe


Morning everyone! 

How are we all today? 


We all remember the last post what was on here don't we? Surely no one has forgotten? ;) 

Well, as promised I said I would do the recipe for these Vanilla Spice sugar cookies, some people have asked for the recipe on Instagram so I thought I would post it on here and then link it back through! 


Vanilla Spice Sugar Cookie: What you will need

4oz / 113g of Butter 
4oz / 113g Sugar 
6oz / 170g Plain Flour
2 tsp's of Vanilla 
3 tsp's of Ginger 

1 Easter Egg shaped cookie cutter (I used Wilton's) 

Directions:

1. Start by turning your oven on to 180c (fan)/200c/ Gas Mark 6.
2. In a mixing bowl, place the butter and the sugar together and beat until fluffy, you will know the butter has been beaten enough once it changes colour to what it was originally before. It will go a pale yellow colour. 

3. Next add in the Ginger and Vanilla and give it another good mix, until everything is incorporated. Add more ginger or Vanilla if desired. 

4. Once everything is mixed, slowly but gradually add in the flour (preferably sifting, if you don't have a sieve don't worry) As your adding the flour in, start to mix the content together, it should eventually be tough to stir.

5. Once all ingredients have been incorporated, place the dough onto a floured surface, sprinkle some flour onto the cookie dough and onto the rolling pin. Start to roll out the dough. Don't forget to keep turning the dough and adding flour underneath, otherwise it will stick to the surface and you will have to start again. 

6. Roll out to required thickness for cookies. Once rolled out, using your egg shaped cookie cutter, cut as many eggs as you can out of the sheet, don't worry if you can't get a lot out, you can always re-roll the dough and make some more for the next batch. 
Repeat this section until you have no more cookie dough. 

7. Place the cookies onto either a greased tray (I used butter and then sprinkle some flour on, but you can use Grease proof paper too!) Make sure when placing the cookies then they have a gap between them all, about two fingers width apart.

8. Place the cookies in the oven on the middle shelf and  bake for 5 minutes or until lightly golden brown around the edges. Once baked, take out of the oven and leave to cool for 10 minutes on a wire rack. 


To Decorate:

For the decoration you can use anything you wish, melted chocolate, icing sugar, sprinkles or royal icing. On the above cookies, we have Royal Icing. 

A quick and easy way for Royal Icing: 

1 x 500g Bag of Tate and Lyle Royal Icing 
1 x Small cup of cold water
Gel food colouring
Spatula
Various Bowls
Spoons
Cling film and / or damp clean cloths

Always remember to cover all icing with a lightly damp cloth, don't use the icing if it has crusted over

1. Add all the Royal Icing sugar into a deep bowl, and add a couple of tablespoons of water into the mix. Using an electric hand whisk, start mixing the icing sugar on the slowest speed setting. BE CAREFUL OF SUGAR DUST FLYING EVERYWHERE. 

2. Slowly start to add a couple more tablespoons into the mix until it starts to become incorporated. Once everything is mixed together, you should be left with a stoggy icing, add a teaspoon of cold water into the mix and beat at a high speed for 5-7 minutes. The texture and thickness will start to change.

There are three types of icing that you will need: 

1. Stiff Peak -  Dab your spatula on to the icing, once it comes of there should be a peak of icing, if the peak stays up, is sturdy and does not fall, you have achieved Stiff Peak.
2. Soft Peak - Do the same as what you did with Stiff Peak, but if the icing peak bends or falls, this is smooth enough to be Soft Peak. 
3. Run out - Run out icing, or is used for filling in or "flooding" a large, flat surface area such as a cookie. To achieve this, you should start with Stiff Peak, gradually adding water to then achieve Soft Peak, there is a method called the "7 Taps" this is when you lift the spatula out of the icing, make a pattern on the surface and then tap the bowl 7 times. After the seventh, all the  lines or pattern should disappear. Once you get to this stage you know it is ready. Always keep checking the consistency with the spatula

3. Once you reach Stiff peak, spoon desired amount into bowls and mix with chosen colour (Preferably gel colours, water based ones will cause the consistency of the icing to change) Mix the colours that you need. If your doing the design above, you will need: 

White - Stiff Peak 
Yellow - Soft Peak

4. With your White Stiff peak icing, place a number 2 nozzle in the piping back and snip off the end. Add in the White stiff peak icing, gently and carefully pipe a pattern of a cracked egg shell around the base of the egg cookie. Just like on the picture below. 


5. Leave for a few minutes until the edges are dry, once dried get your white run out icing, flood the inside of the "shell" and leave to dry for t10 minutes. 

6. Repeat 4 & with correct colours for the rest of the design, or create your own! 

Hope you enjoyed this recipe and the design!

Much love as always, 

Three Tiered Victoria Monster Cake


Evening everyone!

How are we all doing? 

Bit of an old cake I'm afraid, by old I just mean that I forgot to post it!

The cake is just like the Chocolate Monster Cake which you can see here! But it's Victoria Sponge..Go on, click the link, you know you want too ;)

But it's Victoria Sponge!


Don't look! There's a baby picture of me in the background! *Covers screen with hand* Anyway, I'll crack on with it shall I? 

The above cake, was again three tiers, with vanilla buttercream and strawberry jam sandwiching the sponges together. Crumb coated then covered in smooth Vanilla buttercream. 

Green, white and lilac meringue kisses we're made and placed on top and around the base of the cake (I thought this added more 'WOW' factor to it, don't you think?"
Milk, dark and white chocolate shards, covered in pretty pearlescent sugar balls and then sprayed with silver shimmer spray. I have christened this chocolate bark, Galaxy Bark!
The cake then had the chosen sweets (By my granddad for my granddad) Which we're the classic, Bassett All-sorts! 


I LOVE making these Katherine Sabbath inspired cakes! They're just so fun to make and you can never go over the top or do too little, they always look elegant and crazy which is just amazing and so fun! They're so creative! Give it a go yourself and go mad!


We also made some cupcakes for the special occasion! Fluffy Vanilla sponge, smooth Vanilla buttercream, complete with Silver and Gold shimmer '80' toppers!


I enjoy making these cakes so much and I enjoy working with buttercream even more, it makes such a great finish and they just look beautiful!

If YOU wish to make this cake, stay tuned and the recipe will be up soon! 

Much love as always, 


Monday, 13 April 2015

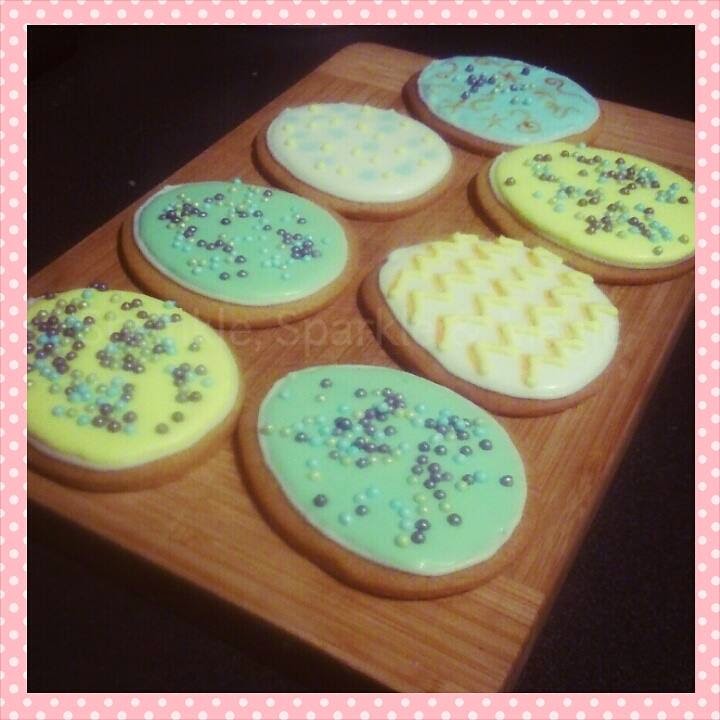
Royal Iced Easter Themed Sugar Cookies


Howdy everyone! 


I'm in a bit of a poorly state this week, which sucks! I've spend all week having smoothies and what good has it done me? Nothing I tell you, as I have still caught a cold! 

Anyway, take a look at these beautiful and cute little Easter Egg cookies that we're made a while back! I know I should of posted these up for Easter but then I feel I would of been cheating as I never even made them around Easter! Although I did make them as a belated one! 

I was practising my Royal Icing skills for my college course, which I finish next month! I can't believe it, I don't know where I'll be without it, but I will hopefully be going on to Level 2 so it isn't all bad! :) I will do a post to 'celebrate' the end of the college year with everything I have made.  


I used the Wilton Easter Egg cutter for both sets of cookies, the recipe was a new one that I tried and made which I have now Christened Vanilla Spice. I will post the recipe for the cookies onto another post so you can give them a go yourself! :D 

I'm really happy with the way they both turned out and feel that I am getting better at Royal Iced cookies, plus my college teacher started following me on my Instagram account, so I felt I had to really really try haha, not that that I don't anyway as I always give it 100%! 

I just love the little chicks in their little egg shells, all the colours on the Easter Egg ones too! Especially seeing as they're all pastel colours! 

Hope you will enjoy making the cookies too! 

Post more later!

Much love as always, and baking wishes, 

Saturday, 11 April 2015

Meringue Kisses!


Afternoon everyone! 

Got another post for you today, yes I hear what you're saying! "Two in the past couple of days? Is she okay?" I'm pretty well thank you, I just feel the need to tell you all what has been happening in the world of SSM (I sometimes think I should of chosen a better name, more suitable sounding when I shorten it down, but I don't know what I could change it too! All ideas welcome!) 


As you can see with these pictures, they are colourful, cute and very tasty and moreish - In the words of Mr. B. The recipe is from the wonderful Meringue Girls who are a couple of brilliant women who go by the names of Alex Hoffler and Stacey O'Gorman, who have opened their beautiful business in London! 

I've been wanting their cookbook for a while but I'm still waiting haha, it might end up being wrapped up for my 21st or even under the tree later this year. In the meantime, I will persist with this one wonderful recipe and colour and change taste by my own accord. 

The recipe is simple, much more simple than I thought it would be though I did have to shuffle through a few sites to see what other people we're putting the oven temp too, as it doesn't mention it on the recipe page on their site. 


It has taken me quite a few attempts with the Kisses to get them just right, the colour, the taste and the size. The first time wasn't a success and I remember my dad saying that I had done something wrong (A past food chess and patisserie chef too - It's where I have got my foodie life from I have decided) 

But since then, whilst I was practising, I made the recipe smaller so there was no wastage. But now I am slowly mastering it and I can go back to the normal recipe which is ace! I just love making meringue! Whether it be the kisses or a pavlova, there's just something about it that's so soothing. Think on the same par as bread! 

If you wish to make some lovely little meringue kisses yourself, then I will be doing a follow up post with the recipe from The Meringue Girls  and a detailed description my myself on how to get those lovely meringue kisses and how to keep practising! 

More posts to come soon so keep your eyes open! 

Much love as always, keep baking! 

Monday, 8 December 2014

Cycling Cake


Dad's birthday cake last year!

He's gotten really into his Cycling over the year and I've very very proud of him for what he has achieved so far with it. This was before he went on his cycling trip, where he cycled around Holland on his own only taking his bike and his tent and money. 

Very well done to my dad! HOOZAH!

He liked the cake and he enjoyed his holiday even more, but he was tired when he got back :) 

Looking back now, this is another cake that I want to re-do as I have learnt quite a bit over this year since going to college and feel I could of decorated and designed the bike a bit more. 

The cake was Vanilla Victoria sponge with raspberry jam inside :) 

- Em xx