Showing posts with label sprinklesparkleandmagic. Show all posts

Friday, 28 August 2015

Milkyway and Malteaser Double Chocolate Brownies


Hi everyone! 

Hope you're all doing well? 

Below is a recipe for Malteaser and Milkyway Double Chocolate Brownies, the recipe has been adapted and the original recipe can be found here I always use this recipe as a base for my brownies and then add in whatever I desire, and this time it was Milkyway chocolate bars and Malteasers!

***Please note, the below recipe is the scaled down (Original) version. To make my brownies, I used a large deep set rectangle baking tray - The recipe below therefore does not produce large chunky brownies. I double the recipe to get the desired thickness for the brownies - In red are the weights for the doubled up versions***


There not burnt! It's just the filter I used! Should of used a different one I suppose ;) 

Makes 20 
(Or more depending on how big you want the squares) 

Ingredients: 

185g  Butter - 370g Butter 
185g Dark Chocolate - 370g Dark Chocolate
85g Plain Flour  - 170g Plain Flour
40g Cocoa Powder - 80g Cocoa Powder
50g - Milk Chocolate - 100g Milk Chocolate
50g - White Chocolate - 100g White Chocolate 
3 Large Eggs - 6 Large Eggs
275g Caster Sugar - 550g Caster Sugar 

You will also need: 


Spoon or Spatula 

x 2 large bowls or any mixing bowls 
A couple of big and little spoons
A large rectangle baking tray
Greaseproof paper 


Let's begin shall we? 


Step 1: Boil the kettle then place the hot water into a pan, that's on a low heat on the stove to create a bain marie. Break up 185g of dark chocolate into chunks and place into a heat proof bowl, add in the butter as well and give it a little bit of a stir. Then place the bowl onto the pan with the water in, be careful! Don't burn yourself and watch out for any water spitting out at you - try not to get any water into the chocolate. Occasionally stir the chocolate so it doesn't stick to the bottom on the bowl, once the chocolate and the butter is all incorporated, with some oven gloves or a tea towel, carefully take the bowl off the heat and place to one side to cool down for a while. - You can also do this in a microwave if you have one available :) 

Step 2: In one bowl, sieve together the flour and cocoa powder until it's all Incorporated together in the bowl. Then place to one side whilst you sort out the other ingredients.


Step 3. crack all the eggs into a jug or container and give it a whisk until it is all mixed in, then add the sugar into your other bowl, once you have done this add in the eggs.  You need to keep whisking the eggs until the mixture creams together, goes a paler colour and gets thicker.


 Keep whisking for a bout 5-7 minutes, you will know it's done by lifting your whisk or fork out of the mix and when it leaves a trail over the surface it should stay for a second. If it doesn't whisk a little more. 


See the trail from the fork? That's what you're looking for.

Step 4: Add in the cooled melted chocolate, it may still be a bit warm but that's okay! So long as it's not hot chocolate, otherwise it will turn to very sugary scrambled egg, so make sure you leave it to cool.  Very slowly mix the chocolate into the egg and sugar mix, you don't want to mess up all the work you put into mixing in the previous stage. Keep mixing until it is all combined and looks like the below picture. 


Step 5: Slowly sieve in the chocolate powder and the flour, once it's all into the bowl;. Mix with the method of plunging your spoon / spatula into the back of the mix and then drag the spoon towards yourself, the mix will slowly start to fold in on itself. 


It will start to go to a fudge like consistency like the below picture. 


Step 6:  Grease the tin with butter, sprinkle with flour then line with Grease proof paper, leaving some paper hanging over the edges so it's easier to take out of the pan once baked. 

7. Pour half the mixture into the tray and smooth out, then cutting chunks of chocolate up scatter the Milkyway and the Malteasers onto the mixture. 


Then our the rest of the mix on top, and then the rest of the chocolate bar and Malteasers!


8. Bake in the oven for 25 minutes in the middle of the oven, when the timers up check the brownies, if they are wobbling too much, place back in the oven for 10 minutes.

When you check, you're looking for a slight wobble, when you get this take it out of the oven and place on the side still in the pan and leave to completely cool. 

Once cool, cut how you desire! 
And enjoy!

Much love, 


Tuesday, 11 August 2015

Vintage Victoria Sponge Cupcakes


Hey guys and girls! 

I hope you are all well this evening? 

I'm so sorry that I haven't posted in a while, on any of the pages! Twitter, Facebook, Instagram and on here, but if you pop over to the life page, you can find out on what is taking me so long!

Now, I don't know about you; but the weather has been going up and down like a rocket! What with it being warm one week, blistering hot the week after, then dropping all the way back down into the singles nearly! 

If you have only just got here, we we're just talking about the typical British weather! 


Recipe: 

Start by weighing 2 large eggs, whatever the eggs they come too,
weigh the same for the following ingredients: 

Self Raising Flour
Butter
Caster Sugar

You will also need: 

1 x Punnet of Fresh Strawberries
300ml of Double Cream
1 tsp Vanilla
1-2 tbsp Milk
3 tsp Caster Sugar
1tsp Baking Powder 
Cupcake Cases

Let's get started!

1. Firstly, set your oven to 170 C, 350 F, Gas Mark 4 so it can heat up in the meantime.
You can also lay out the cupcake cases into the tray. 

2. Place the butter and sugar into a bowl and give it a good whisk until the butter goes a bit more pale. Then in a cup, crack open the eggs and give a good beating, once beaten, slowly but gradually add in the eggs a bit at a time. The mix will go all runny and may look curdled, but don't worry!

3. Next, sieve the flour and baking powder together in a separate bowl, once you have done this put it back through the sieve one bit at a time and gradually add it to the egg and butter mixture. I like to mix with a wooden spoon first - Just so none of the flour shoots out!

4. After gradually adding the flour and mixing in between, your mixture should be well incorporated. Once it is add in the milk and the vanilla, then mix again until soft and pale.

5. Spoon the mixture into the cases just below half, don't over fill as they will flood over the cases and we don't want that! Once you have used all the mixture, place into the oven for 10 minutes. After the 10 is up, check the cupcakes if they are still wobbling, leave them in for another 5-10 mins. 

6. Once the timer is up, take them out of the oven and leave them to cool IN THE TRAY.
DO NOT take them out of the tray, as they are still warm and can easily lose their shape. Leave them in until completely cool, then remove.

Topping

If you saw my post for the Vintage Victoria Sponge, the recipe and the guidelines for the fresh cream topping can be found on this post. 

If you don't want to click the link or don't have time, I have still posted a quick how to below, but it has been taken from the Vintage Victoria Sponge cake post. 

7. Whilst the cake is cooling, place the 300ml of double cream into a bowl, add 3 tsp of sugar and give it a good whisk on a medium - high speed.  
You will soon see the consistency of the cream start to change, keep going until you have soft speaks. Once you get to this stage, place some clingfilm over the top and place into the fridge to keep cool until the cake has fully cooled. 

8. When the cakes are cool, add a dollop of the cream onto each of the cupcakes, then after the strawberries have been washed and the tops are off. You can either cut them in half or place them whole on top of the cupcakes. And there you go! Once the cream is on, be sure to keep them the fridge to save the cream from going off. 

Enjoy!


Wednesday, 22 July 2015

Vintage Victoria Sponge Cake


Hi everyone! 

How are we all today? I'm sorry I haven't been posting as of late, I've been super busy with things!
Head on over to  - The Life Of Sprinkle, Sparkle & Magic - Where you will find out why I have been so quiet and what has been happening with the world that I live in. 


In other news, see that big and beautiful cake above? I'm going to give you the recipe on how to create it, perfect for a lovely and warm summers day or as a comfort cake! The recipe has been adapted in some ways from the recipe by Cupcake Jemma, go and take a look at her page and youtube channel! - Cupcake Jemma's Youtube Channel 


Right! Let's get started!...

You will need: 

3 Eggs
Self Raising flour
Softened Butter
Caster Sugar
1 tsp Vanilla Extract 
1 tsp Baking Powder
1-2 tbsp Milk

--------------------

300ml Double cream
3 tsp Caster Sugar
Punnet of Fresh Strawberries and Blueberries 
Icing Sugar 
(Can opt out of the fresh fruit and change it to whatever you wish!) 

1. Set the oven to Gas Mark 3 / 170°C / 140°C (Fan)  

2. First off we need to weigh our eggs - I recently learnt this from Cupcake Jemma and have done it ever since, it's such a good thing to do and don't know why I've never heard of it before! 

3. So weigh the eggs and whatever they come too, weigh the same for the butter, caster sugar and the self raising flour. This will give you the prefect fluffy and soft cake! 

4. Once you have all your ingredients, place the butter into a bowl and whisk on a medium speed - If you don't have an electric whisk, no need to worry! You can always use the old good natural whisk! - Just be careful with those arms ;) Once the butter has been incorporated and changed colour - it should go a paler colour compared to when you first put it into the bowl, and should be nice, smooth and fluffy. 

5. Sieve in the sugar and whisk again on a medium speed until everything is incorporated. 
Next, get a spare bowl or cup and add all the eggs into it, give them a good whisk! Once you have done this, add in the eggs in three stages, like you would do if you we're cracking them into the bowl. Add in a bit of egg each time, whisking on a low - medium speed in between until it has all been mixed in. 

6. Once all the eggs have been mixed in, get the Self-Raising flour and add it into a fine sieve, or any sieve! Add in the Baking Powder too, gently shake the flour into the mix until it's all into the bowl - You may do this in stages to stop flour spilling over the edge of the bowl! I like to use a spatula or a spoon to gently fold in the flour first, instead of going straight to the whisk as I don't want it to fly everywhere! Once you have got some of the flour folded in and it looks like none will come out over the bowl, get whisking on a medium - high speed until it's all mixed in! 

5. Add in the milk and the vanilla extract and give it another good mix - If you think there needs to be more milk or flour just add it in - everyone has their own preferences! I know that the mix is the right consistency, by getting a big dollop onto the spoon and holding it above the bowl, it should take a few seconds for it to drop back into the bowl, if it falls off quicker than this or won't budge at all, it's the wrong consistency and you will need to add a bit more milk if it's too thick or a bit more flour if it's too thin. 

6. Grab two 8" cake tins and grease them with some butter using some greaseproof paper, then add a little bit of flour into the pan and move it around, getting onto all the sides and in the groves. Once this is done, evenly dispatch the cake batter into both tins, then grabbing a spoon or a pallet knife evenly smooth the tops of the cakes; this will cause them to be nice and flat when they come out of the oven. 
Place in the middle of the oven for 20 minutes. Check to see if the cake is done by placing a knife into the centre, if it comes out clean and the top of the cake springs back once pressed gently, it is ready. Only take the cake out to test after 20 mins, DO NOT take out any sooner. 

7. Whilst the cake is cooling, place the 300ml of double cream into a bowl, add 3 tsp of sugar and give it a good whisk on a medium - high speed.  
You will soon see the consistency of the cream start to change, keep going until you have soft speaks. Once you get to this stage, place some clingfilm over the top and place into the fridge to keep cool until the cake has fully cooled. 


8. Cut the tops off the strawberries and then cut them all in half, give the strawberries and blueberries a good wash and then leave them to dry a little. 
9. Finally, face one of the sponges down onto a plate or board, add some of the cream onto the cake and then place some strawberries on top. Creating a circle of strawberries with the pointed end sticking in the centre, imagine an open flower. Place the other layer of sponge on top and press lightly, then add some more of the cream on top, then some strawberries and blueberries (you may place blueberries in the middle of the cake too! completely up to you!) Then add a dusting of icing sugar to the cake! 

All there is left to do, is cut yourself a big slice of cake and dig in! 


Hope you enjoyed this recipe! Once again, ideas where taken from Cupcake Jemma, I just adapted it a little bit, go check her out!
 Tune in next time!

Much Love, 

Monday, 13 April 2015

Royal Iced Easter Themed Sugar Cookies


Howdy everyone! 


I'm in a bit of a poorly state this week, which sucks! I've spend all week having smoothies and what good has it done me? Nothing I tell you, as I have still caught a cold! 

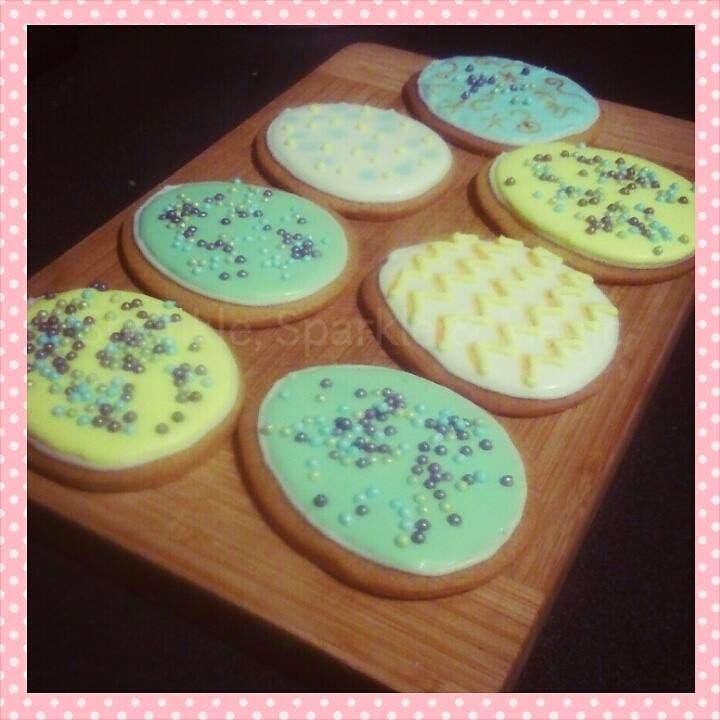
Anyway, take a look at these beautiful and cute little Easter Egg cookies that we're made a while back! I know I should of posted these up for Easter but then I feel I would of been cheating as I never even made them around Easter! Although I did make them as a belated one! 

I was practising my Royal Icing skills for my college course, which I finish next month! I can't believe it, I don't know where I'll be without it, but I will hopefully be going on to Level 2 so it isn't all bad! :) I will do a post to 'celebrate' the end of the college year with everything I have made.  


I used the Wilton Easter Egg cutter for both sets of cookies, the recipe was a new one that I tried and made which I have now Christened Vanilla Spice. I will post the recipe for the cookies onto another post so you can give them a go yourself! :D 

I'm really happy with the way they both turned out and feel that I am getting better at Royal Iced cookies, plus my college teacher started following me on my Instagram account, so I felt I had to really really try haha, not that that I don't anyway as I always give it 100%! 

I just love the little chicks in their little egg shells, all the colours on the Easter Egg ones too! Especially seeing as they're all pastel colours! 

Hope you will enjoy making the cookies too! 

Post more later!

Much love as always, and baking wishes, 

Sunday, 12 April 2015

Three Tiered Chocolate Monster Cake (Katherine Sabbath Inspired)

Hey everyone!


Would you just look at that Monster?! 

I had such a blast making this cake! It is inspired by the wonderful and talented Katherine Sabbath and her own cakes, which are just out of this wold! Take a look below!


ALL CORYRIGHT FOR THE ABOVE PICTURE IS KATHERINE SABBATH, I DO NOT OWN THIS PICTURE OR THE CAKE DESIGN.

Isn't it just beautiful? Look at all those colours, though this is a cheesecake not a cake, but its still brilliantly impressive! I cannot find her online through a website to link to or on Facebook, but she is on Instagram so go search for @Katherine_Sabbath and give her a follow!


So this was my cake, and the first of taking on the inspiration for doing a Kat inspired cake! I loved designing and making this cake, it was such fun and was completed in 48 hours which I was very surprised with if I'm honest!

The cake itself is a three tiered sponge cake, with two layers of chocolate and one layer of coffee cake which is in the middle of the two chocolates. The sponge was then all sandwiched together using coffee buttercream and then crumb coated in the same buttercream. 


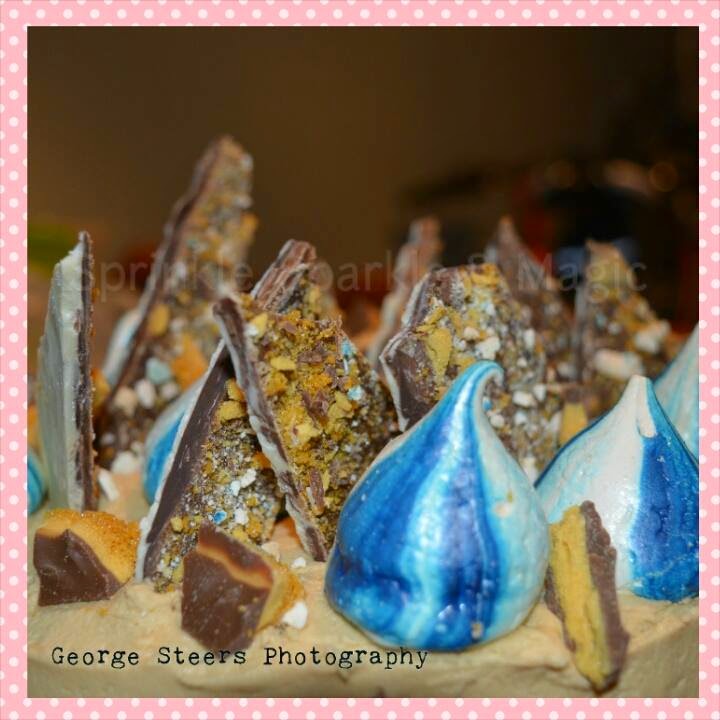
The cake was then covered in Coffee buttercream, and chocolate bark shards we're placed on top as well as white and blue meringue kisses, chunks of golden crunchie bar was also sprinkled over the top of the cake. A full on chocolate and coffee overload! 


Here's a close up of the Chocolate Bark before it went onto the cake! White, milk and dark chocolate with crushed crunchie pieces and crushed meringue kisses sprinkled on top! Such a golden effect! It reminded me a bit of gold nuggets hehe 


Side view of the cake, with the meringue kisses, chocolate crunchy and the chocolate shards! 


And there we have it! That's the big monster of a chocolate cake haha
Think this photo is my favourite out of all of them. Big thanks to my younger brother for taking some fab pics of the cake! 

Much love and baking wishes! 

Saturday, 11 April 2015

Detailed Meringue Kisses How To!

Hey everyone! 

Did you see the post on the Meringue Kisses that we made? Fancy having a go at them yourself? To impress people or loved ones? But don't know where to start? Then look no further! All recipe rights and copy rights are from the Meringue Girls, two wonderful and creative ladies! Go check out their site! The Meringue Girls - Meringue Kisses


Wording in this recipe is my wording, but the actual recipe is from the lovely girls. Please go to their website and pay them a visit, they're wonderful! 

The Recipe - Taken from Meringue Girls site
 ALL RECIPE COPYRIGHT TOWARDS THE MERINGUE GIRLS

Ingredients: 

5 Medium sized eggs
300g Golden Caster Sugar 
Flavouring if desired, I used 2 teaspoons of Vanilla 

Directions:

1. Line a large FLAT baking tray with grease proof paper, possibly making it a little bit bigger so you are able to pick the paper up once out of the oven if you wish.

2. Pre-heat the oven to 200c / Gas Mark 5  - Place 300g Caster sugar into the baking try and place into the oven.  Leave for 5 minutes (Also put a timer on your phone, I find it helps me!)

3. Whilst the sugar is in the oven, crack the egg whites into your bowl - Make sure that your bowl is free from any grease, grease will cause the meringue not to form properly resulting in a dull and floppy mixture and the egg wont be able to reach stiff peak.

4. Whisk the egg whites up until they form little bubbles, keep going until the whites have doubled in volume and are forming stiff peaks. You can do this by using the whisker or a fork, place into the whites and pull out, if the mix stands stable and does not flop, you have reached Stiff Peak, if it droops, keep going! You need those peaks! 

5. Once you have stiff peaks, your sugar will be ready to come out of the oven. TURN THE OVEN DOWN TO 100c / Gas Mark 1 - BE CAREFUL, SUGAR IS VERY DANGEROUS WHEN HOT AND CAN BURN!..Plus it's very painful! 
You will know the sugar is ready the the edges starting to caramelise, now, you can either get a large spoon and spoon the mixture into the eggs spoonful at a time, but I find it difficult as I have a hand held mixer and I'm only good with my right hand - see where I'm going with this? So! I grab the edges of the grease proof paper, lift it out of the tin and poor the sugar into a deep microwavable bowl, I find it easier. 

6. So to elaborate on that more, whisking on a slow speed, either spoon the sugar into the egg whites spoon at a time, mixing all the time with the whisk to get the meringue texture. Or you can pour the sugar into the egg whites bit at a time and mix it the same.

7. Once all the sugar has gone into the eggs, add the vanilla and keep whisking it all in starting on slow to begin with then speeding it up keep whisking for 5-7 minutes on a high speed until the meringue mix forms and you start to get stiff peaks again. Get some meringue mix between your fingers and feel it, if it still feels gritty, it needs more of a mix. This is just the sugar that has not been incorporated into the mix. 
You will know the meringue mix is read when it forms beautiful smooth and glossy peaks! Gently give the mix a stir, don't beat it otherwise you will knock out all the air and you need that air!

You are now ready to get piping! 

1. Line a baking tray with some fitted grease proof paper

2. Grabbing a piping bag, preferably a disposable one, turn the bag inside out and with a chosen colour, paint 5 big, bold colourful lines on the inside of the bag starting from the tip and ending somewhere in the middle of the bag (you don't want to have dye at the top and get it on your hands when turning it inside out) Turn the bag back inside out so the dye is on the inside now. 

3.With a large spoon, gently place some of the meringue into the piping bag, in my experience from learning a whole bag will give you a tray full of 24 meringue kisses with a little spare - I have made a print out diagram but I just need to host it first!

4. Get the air out of the top of the bag, place your hand on top of where the mix ends, grip it tight and let the air come out at the top, once done lightly grip it and place on a work surface and gently beat the air out of the bag making sure none of the mixture comes out the other end - This will give you nice and smooth flowing meringue mix with no air bubbles ruining those perfect kisses! 

5. I find it's best to hold the piping bag upright, tip at the top since when you cut it off it wont suddenly start to pour out from the gravity. Once done, tightly spin the piping bag till it closes off the Meringue from falling out, when your ready snip the top off of the piping bag, your looking to cut off about an inch and a half. 

6. Hold the top of the bag with your strong hand (See how I'm holding the orange Piping bag?) and the other hand resting on the bottom near the tip so you have a grip on where to guide it. In a spare bowl, gently sqeeze some of the meringue out until the white has gone and you start to see streaks of colour. Once this happens you can start to pipe onto the baking tray! :D 


7. So the grease proof paper stays still as you pip (as meringue can get quite sticky!) pipe little dots into each corner of the tray then stick down the paper. Once ready, hold the piping bag as mentioned and then hold it at a straight so you are piping downwards. Hold it about two inches from the baking tray, do not hold it near the tray base itself, this was my mistake when learning and created really flat kisses, not the lovely bulbs. I think of when I pipe royal icing at college as it helps me. Your wanting to create a bulb, say like the shape of a bulb you would plant in your garden. 

8. So piping it a little off the baking try, gently squeeze the piping bag, don't lower the bag into the meringue 'blob' or start to bring it up as it pipes. When it starts to bulge upwards slightly, bring it up and stop piping suddenly, this will stop the flow of the meringue and give the meringues a nice flick. Once piped all the meringues, you should have 24. if not if you have less or a bit more it's perfectly fine! The recipe makes about 50 but depending on what size you do them you could make up to 100! To be honest when I first started I didn't believe they would all fit onto the tray so I did 6 rows of 3 meringues ;) Keep practicing! 


9. When all the meringues are on the tray and you cannot fit anymore on, place them into the oven on the middle shelf. Now it depends with all ovens I know, I made some at Mr. B's and kept them in the oven for 30 mins and they we're perfect. Did the same at mine with the same temp and time but they slightly went a caramel colour, which was fine! I thought they looked a bit 'Vintage' hehe still tasted lovely though!
So if I We're you, I would place them in the oven for 20 mins and put a timer on, you are looking to be able to pick them up from the tray easily, if they still stick to the tray they aren't done. 

10. After 20 mins, if they are still sticking place them in for another 10 mins. If they are fine then it's all good! Roughly place them in for 20-30 mins :) The center should be still soft and chewy when you take a bite! 

Hope this helps anyone wishing to make Meringue Kisses! As mentioned every inch of the recipe and recipe instructions are from The Meringue Girls so please give them credit, the detailed description on piping and how to's are from us here at Sprinkle, Sparkle and Magic. Hope this has helped anyone! Any questions you can email, tweet, facebook message, instagram message or even message or comment us on here! Happy to help!

P.s: DON'T BE AFRAID! It's practice, take a deep breath and if you don't do it right the first time, don't give up! You will get there! I know, I've been there myself and still getting the hang of it!  ;) 

Much love and Meringue Kisses!

Meringue Kisses!


Afternoon everyone! 

Got another post for you today, yes I hear what you're saying! "Two in the past couple of days? Is she okay?" I'm pretty well thank you, I just feel the need to tell you all what has been happening in the world of SSM (I sometimes think I should of chosen a better name, more suitable sounding when I shorten it down, but I don't know what I could change it too! All ideas welcome!) 


As you can see with these pictures, they are colourful, cute and very tasty and moreish - In the words of Mr. B. The recipe is from the wonderful Meringue Girls who are a couple of brilliant women who go by the names of Alex Hoffler and Stacey O'Gorman, who have opened their beautiful business in London! 

I've been wanting their cookbook for a while but I'm still waiting haha, it might end up being wrapped up for my 21st or even under the tree later this year. In the meantime, I will persist with this one wonderful recipe and colour and change taste by my own accord. 

The recipe is simple, much more simple than I thought it would be though I did have to shuffle through a few sites to see what other people we're putting the oven temp too, as it doesn't mention it on the recipe page on their site. 


It has taken me quite a few attempts with the Kisses to get them just right, the colour, the taste and the size. The first time wasn't a success and I remember my dad saying that I had done something wrong (A past food chess and patisserie chef too - It's where I have got my foodie life from I have decided) 

But since then, whilst I was practising, I made the recipe smaller so there was no wastage. But now I am slowly mastering it and I can go back to the normal recipe which is ace! I just love making meringue! Whether it be the kisses or a pavlova, there's just something about it that's so soothing. Think on the same par as bread! 

If you wish to make some lovely little meringue kisses yourself, then I will be doing a follow up post with the recipe from The Meringue Girls  and a detailed description my myself on how to get those lovely meringue kisses and how to keep practising! 

More posts to come soon so keep your eyes open! 

Much love as always, keep baking! 

Friday, 10 April 2015

Easter Specials!

Hey everyone! 

How are we all? 

I know the title may put you off a little, Easter posts, on the 10th? I know I know, it's my fault and I need to update more often, I'm not doing bad though! 

I've been a bit busy, what with making a dozen 80th Cupcakes then an 80th Birthday cake and testing some new cupcake recipes out, it's all been a bit hectic. So I'm trying to post ASAP. But! You will be happy to know that after this post we will be (soon) up to date, we are more up to date now with the posts than we we're a bit ago, let's just say that! 


Eee! Just look at those cute little pink and green Easter Eggs inside those cookies!

These are "slice" sugar cookies, there is a word for it but I can't remember it! Basically, it's a Vanilla Sugar cookie recipe, and then halved into colours of your choice and the design you wish to use. The recipe is  by a wonderful woman called Ruth Clemens A.K.A The Pink Whisk, go check out the recipe here ---> The Pink Whisk - Sugar Cookies

Such a great recipe, Ruth truly does have some great recipes and I have used quite a few of hers in the past, go and take a look! She's a bloody star!

I've been wanting to do something like this for a while but didn't really know how too, so I thought I would give it a search and found so many things to do with it on Instagram, such a wonderful place for any kind  of inspiration! 

So I found this incredible woman who makes cookies that just blew me away! I first saw Eugenie Kitchen on Youtube whilst scrolling through different youtubers pages and I was just fascinated by what she has baked! There are tutorials as well which she has kindly filmed and they helped me to create these wonderful Easter Egg themed sugar cookies. 

Valentine's Day Rainbow Heart Cookies - Eugenie Kitchen
Copyright of Eugenie Kitchen

It is based on the Heart cookies above, but I decided to do mine a little different and go for an Easter Egg seeing as it was Easter! I sadly forgot to get the sprinkles though, I will have to remember them next time! 


So here is what the dough looked like before the finished cookies (Top pic!) I Just love the way they look, cute isn't even close! So there you have it, Vanilla sugar cookies with a lovely Easter twist pattern inside. Big thanks to the super ladies and their blogs, make sure you go and check them out!! 


We also made a big batch of triple chocolate brownies! Which was white, dark and milk chocolate, then filled with milk chocolate chunks! As requested by Mr. B! Do love making brownies, do you like making brownies? Have any new recipes you wish to share? Let me know and I'll give them a go! 

Much love, hope you all had a lovely Easter! (Bit late I know! Haha) 


Ooh! Check that out! Brand new signature, we're moving up ladies and gentlemen!