Showing posts with label icing. Show all posts

Wednesday, 22 July 2015

Vintage Victoria Sponge Cake


Hi everyone! 

How are we all today? I'm sorry I haven't been posting as of late, I've been super busy with things!
Head on over to  - The Life Of Sprinkle, Sparkle & Magic - Where you will find out why I have been so quiet and what has been happening with the world that I live in. 


In other news, see that big and beautiful cake above? I'm going to give you the recipe on how to create it, perfect for a lovely and warm summers day or as a comfort cake! The recipe has been adapted in some ways from the recipe by Cupcake Jemma, go and take a look at her page and youtube channel! - Cupcake Jemma's Youtube Channel 


Right! Let's get started!...

You will need: 

3 Eggs
Self Raising flour
Softened Butter
Caster Sugar
1 tsp Vanilla Extract 
1 tsp Baking Powder
1-2 tbsp Milk

--------------------

300ml Double cream
3 tsp Caster Sugar
Punnet of Fresh Strawberries and Blueberries 
Icing Sugar 
(Can opt out of the fresh fruit and change it to whatever you wish!) 

1. Set the oven to Gas Mark 3 / 170°C / 140°C (Fan)  

2. First off we need to weigh our eggs - I recently learnt this from Cupcake Jemma and have done it ever since, it's such a good thing to do and don't know why I've never heard of it before! 

3. So weigh the eggs and whatever they come too, weigh the same for the butter, caster sugar and the self raising flour. This will give you the prefect fluffy and soft cake! 

4. Once you have all your ingredients, place the butter into a bowl and whisk on a medium speed - If you don't have an electric whisk, no need to worry! You can always use the old good natural whisk! - Just be careful with those arms ;) Once the butter has been incorporated and changed colour - it should go a paler colour compared to when you first put it into the bowl, and should be nice, smooth and fluffy. 

5. Sieve in the sugar and whisk again on a medium speed until everything is incorporated. 
Next, get a spare bowl or cup and add all the eggs into it, give them a good whisk! Once you have done this, add in the eggs in three stages, like you would do if you we're cracking them into the bowl. Add in a bit of egg each time, whisking on a low - medium speed in between until it has all been mixed in. 

6. Once all the eggs have been mixed in, get the Self-Raising flour and add it into a fine sieve, or any sieve! Add in the Baking Powder too, gently shake the flour into the mix until it's all into the bowl - You may do this in stages to stop flour spilling over the edge of the bowl! I like to use a spatula or a spoon to gently fold in the flour first, instead of going straight to the whisk as I don't want it to fly everywhere! Once you have got some of the flour folded in and it looks like none will come out over the bowl, get whisking on a medium - high speed until it's all mixed in! 

5. Add in the milk and the vanilla extract and give it another good mix - If you think there needs to be more milk or flour just add it in - everyone has their own preferences! I know that the mix is the right consistency, by getting a big dollop onto the spoon and holding it above the bowl, it should take a few seconds for it to drop back into the bowl, if it falls off quicker than this or won't budge at all, it's the wrong consistency and you will need to add a bit more milk if it's too thick or a bit more flour if it's too thin. 

6. Grab two 8" cake tins and grease them with some butter using some greaseproof paper, then add a little bit of flour into the pan and move it around, getting onto all the sides and in the groves. Once this is done, evenly dispatch the cake batter into both tins, then grabbing a spoon or a pallet knife evenly smooth the tops of the cakes; this will cause them to be nice and flat when they come out of the oven. 
Place in the middle of the oven for 20 minutes. Check to see if the cake is done by placing a knife into the centre, if it comes out clean and the top of the cake springs back once pressed gently, it is ready. Only take the cake out to test after 20 mins, DO NOT take out any sooner. 

7. Whilst the cake is cooling, place the 300ml of double cream into a bowl, add 3 tsp of sugar and give it a good whisk on a medium - high speed.  
You will soon see the consistency of the cream start to change, keep going until you have soft speaks. Once you get to this stage, place some clingfilm over the top and place into the fridge to keep cool until the cake has fully cooled. 


8. Cut the tops off the strawberries and then cut them all in half, give the strawberries and blueberries a good wash and then leave them to dry a little. 
9. Finally, face one of the sponges down onto a plate or board, add some of the cream onto the cake and then place some strawberries on top. Creating a circle of strawberries with the pointed end sticking in the centre, imagine an open flower. Place the other layer of sponge on top and press lightly, then add some more of the cream on top, then some strawberries and blueberries (you may place blueberries in the middle of the cake too! completely up to you!) Then add a dusting of icing sugar to the cake! 

All there is left to do, is cut yourself a big slice of cake and dig in! 


Hope you enjoyed this recipe! Once again, ideas where taken from Cupcake Jemma, I just adapted it a little bit, go check her out!
 Tune in next time!

Much Love, 

Tuesday, 9 June 2015

Vanilla Spice Sugar Cookie Recipe


Morning everyone! 

How are we all today? 


We all remember the last post what was on here don't we? Surely no one has forgotten? ;) 

Well, as promised I said I would do the recipe for these Vanilla Spice sugar cookies, some people have asked for the recipe on Instagram so I thought I would post it on here and then link it back through! 


Vanilla Spice Sugar Cookie: What you will need

4oz / 113g of Butter 
4oz / 113g Sugar 
6oz / 170g Plain Flour
2 tsp's of Vanilla 
3 tsp's of Ginger 

1 Easter Egg shaped cookie cutter (I used Wilton's) 

Directions:

1. Start by turning your oven on to 180c (fan)/200c/ Gas Mark 6.
2. In a mixing bowl, place the butter and the sugar together and beat until fluffy, you will know the butter has been beaten enough once it changes colour to what it was originally before. It will go a pale yellow colour. 

3. Next add in the Ginger and Vanilla and give it another good mix, until everything is incorporated. Add more ginger or Vanilla if desired. 

4. Once everything is mixed, slowly but gradually add in the flour (preferably sifting, if you don't have a sieve don't worry) As your adding the flour in, start to mix the content together, it should eventually be tough to stir.

5. Once all ingredients have been incorporated, place the dough onto a floured surface, sprinkle some flour onto the cookie dough and onto the rolling pin. Start to roll out the dough. Don't forget to keep turning the dough and adding flour underneath, otherwise it will stick to the surface and you will have to start again. 

6. Roll out to required thickness for cookies. Once rolled out, using your egg shaped cookie cutter, cut as many eggs as you can out of the sheet, don't worry if you can't get a lot out, you can always re-roll the dough and make some more for the next batch. 
Repeat this section until you have no more cookie dough. 

7. Place the cookies onto either a greased tray (I used butter and then sprinkle some flour on, but you can use Grease proof paper too!) Make sure when placing the cookies then they have a gap between them all, about two fingers width apart.

8. Place the cookies in the oven on the middle shelf and  bake for 5 minutes or until lightly golden brown around the edges. Once baked, take out of the oven and leave to cool for 10 minutes on a wire rack. 


To Decorate:

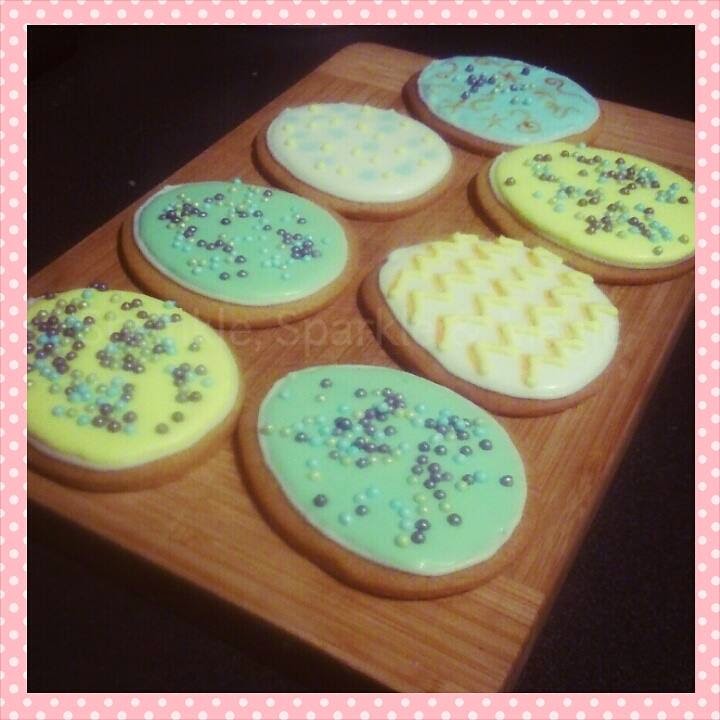
For the decoration you can use anything you wish, melted chocolate, icing sugar, sprinkles or royal icing. On the above cookies, we have Royal Icing. 

A quick and easy way for Royal Icing: 

1 x 500g Bag of Tate and Lyle Royal Icing 
1 x Small cup of cold water
Gel food colouring
Spatula
Various Bowls
Spoons
Cling film and / or damp clean cloths

Always remember to cover all icing with a lightly damp cloth, don't use the icing if it has crusted over

1. Add all the Royal Icing sugar into a deep bowl, and add a couple of tablespoons of water into the mix. Using an electric hand whisk, start mixing the icing sugar on the slowest speed setting. BE CAREFUL OF SUGAR DUST FLYING EVERYWHERE. 

2. Slowly start to add a couple more tablespoons into the mix until it starts to become incorporated. Once everything is mixed together, you should be left with a stoggy icing, add a teaspoon of cold water into the mix and beat at a high speed for 5-7 minutes. The texture and thickness will start to change.

There are three types of icing that you will need: 

1. Stiff Peak -  Dab your spatula on to the icing, once it comes of there should be a peak of icing, if the peak stays up, is sturdy and does not fall, you have achieved Stiff Peak.
2. Soft Peak - Do the same as what you did with Stiff Peak, but if the icing peak bends or falls, this is smooth enough to be Soft Peak. 
3. Run out - Run out icing, or is used for filling in or "flooding" a large, flat surface area such as a cookie. To achieve this, you should start with Stiff Peak, gradually adding water to then achieve Soft Peak, there is a method called the "7 Taps" this is when you lift the spatula out of the icing, make a pattern on the surface and then tap the bowl 7 times. After the seventh, all the  lines or pattern should disappear. Once you get to this stage you know it is ready. Always keep checking the consistency with the spatula

3. Once you reach Stiff peak, spoon desired amount into bowls and mix with chosen colour (Preferably gel colours, water based ones will cause the consistency of the icing to change) Mix the colours that you need. If your doing the design above, you will need: 

White - Stiff Peak 
Yellow - Soft Peak

4. With your White Stiff peak icing, place a number 2 nozzle in the piping back and snip off the end. Add in the White stiff peak icing, gently and carefully pipe a pattern of a cracked egg shell around the base of the egg cookie. Just like on the picture below. 


5. Leave for a few minutes until the edges are dry, once dried get your white run out icing, flood the inside of the "shell" and leave to dry for t10 minutes. 

6. Repeat 4 & with correct colours for the rest of the design, or create your own! 

Hope you enjoyed this recipe and the design!

Much love as always, 

Monday, 13 April 2015

Royal Iced Easter Themed Sugar Cookies


Howdy everyone! 


I'm in a bit of a poorly state this week, which sucks! I've spend all week having smoothies and what good has it done me? Nothing I tell you, as I have still caught a cold! 

Anyway, take a look at these beautiful and cute little Easter Egg cookies that we're made a while back! I know I should of posted these up for Easter but then I feel I would of been cheating as I never even made them around Easter! Although I did make them as a belated one! 

I was practising my Royal Icing skills for my college course, which I finish next month! I can't believe it, I don't know where I'll be without it, but I will hopefully be going on to Level 2 so it isn't all bad! :) I will do a post to 'celebrate' the end of the college year with everything I have made.  


I used the Wilton Easter Egg cutter for both sets of cookies, the recipe was a new one that I tried and made which I have now Christened Vanilla Spice. I will post the recipe for the cookies onto another post so you can give them a go yourself! :D 

I'm really happy with the way they both turned out and feel that I am getting better at Royal Iced cookies, plus my college teacher started following me on my Instagram account, so I felt I had to really really try haha, not that that I don't anyway as I always give it 100%! 

I just love the little chicks in their little egg shells, all the colours on the Easter Egg ones too! Especially seeing as they're all pastel colours! 

Hope you will enjoy making the cookies too! 

Post more later!

Much love as always, and baking wishes, 

Tuesday, 7 April 2015

Mother's Day Cake

Ahh! Hey everyone! 


How are we all doing this evening, morning, afternoon, wherever you are in this big wide world! 

I for one am feeling great, this blog is finally starting to pick itself up (by itself, I mean me...of course...or am I?) 

Anyway, all pages are getting updated, and most of them are all up to date, though sadly apart from this one. BUT! We've nearly got you all covered, seeing as we have a few final posts to go then everything will be all in sync!

We currently have some Banoffee cupcakes in the oven, but we will post them at a later date...hopefully tonight or tomorrow. It has only just occrred to me that I should of probably been putting the dates on these posts to when they actually took place, but I haven't. Sorry guys, may do it at some point! 

So the above photo is the second, yes I did just say second, Mother's Day cake. The first was a dummy and it was made for my college course, but this! Oh no, this beauty was a fruit cake and decorated too! 


It's pretty much the same as the one I made for college, except it has pink roses instead of really pale pink roses, it's mint green instead of pale baby blue and it has some different flowers around the outside and different embossing on the cake board.

So basically, the design is the same, the colours are a tad different, only a tad though! 

I loved making this cake and my Mum and Auntie enjoyed it too, sadly my Nan didn't but she was with us in spirit I'm sure! 

I made the lovely roses, but I know they need working on..I'm sorting that out don't worry, still learning in some ways but aren't we all! I was aiming this page to be a website but it's kind of turned into a blog (which it is I suppose, I know!) But I do prefer it as a blog, so hey ho!


I embossed little flowers around the top of the cake, made thin little pink daisies to go around the outside of the cake too! I then piped 'Happy Mother's Day' in graduated line work on top in white then pink. To top it all off, I pipped a snail trail around the base of the cake in pink and embossed the cake board.  

Ta-Da! All piping was done with Royal Icing :) 

Speak soon and much love, 

Sprinkle, Sparkle & Magic 

Monday, 8 December 2014

Adventure Time - Jake the Dog Birthday Cake


Hey everyone!

So so so sorry I haven't been posting in what seems like forever, I have been busy with work experience, college (Which I will tell you about soon!) and Volunteering at the Library recently. But I will inform you all that I have been doing LOADS of baking of cakes, cookies and puddings! Even bread :) So I will post all of these things up as soon as possible. 

The above picture is the birthday cake that I made for my brother last year for his 17th Birthday. If you can guess who it is, well done! :D If you don't know who it is, it's Jake the dog from a TV show called Adventure Time :) 


So this is Jake the Dog, which is the character who the cake is based upon. 

I really loved making this cake and Jake, I know that the modelling isn't the greatest but it was my first attempt at it and I was well chuffed, and still am looking back in it. Probably not so much now though haha But I really did enjoy making him. 


The cake was lemon, and it was decorated using fondant icing including Jake, which looking back again he probably should of been made out of sugar paste, but oh well! The stars we're made with fondant too and cut out using a star cutter :) 

I love Adventure Time so much :D 

- Em xx 

Saturday, 19 July 2014

55th Wedding Anniversary Cake


Hi everyone, long time no see, or speak should I say? 
I have quite a few cakes to put on here, which should of been on here sooner, but I have recently got a new job, in hopes to save for my cake business and driving lessons haha, but all is going well. So I am a tad busy, but don't let that put you of ever ordering a cake if you need one, I will still be able to make it for you! 

The Cake

Now, this cake was very special to make, and I loved every minute of baking and decorating it, I love making all of them. But this was very special. 
It was made for my Nanan and Granddad's 55th Wedding anniversary, and I loved every minute of making it. 

I know the pattern of the flowers around the cake don't flow well as the packet I bought ended up to have a dud white one, but I'll get it right next time. My Nan has Alzheimer's which is very upsetting and sad though the cake cheered my granddad up who  was very touched by it, which was lovely in a way. 


My nan doesn't eat much anymore, but she does like to eat homemade Victoria sponge cakes, which is good so I make them for her so she has something to eat (Though granddad does like to have his share!) 

The cake is 12" and double layered with smooth strawberry jam in the middle and homemade butter cream icing in the middle. There's fondant icing on the top and the "55th" is also fondant, which was if I'm honest, the numbers we're printed out and I placed them onto some fondant and cut round the paper with a sharp knife. I'm quite proud on how they turned out. 

I then sprayed them with edible silver shimmer spray to give it a shiny touch. The cake board has icing rolled out on top and there is a emerald green ribbon around the base of the cake and a pale blue ribbon around the cake board to give it a nice colourful band and to add a bit of colour to the cake. 


The writing is done using writing icing and I admit it isn't that great, but they we're happy with it.  

Hope you like it, any questions or feedback on it if you can give me any would be great! :) 

- Emma x

Greyhound Records - Record Company Launch


Hey there!

So I haven't updated this in a while, but I need to do like three posts on three different cakes and then after I need to do another post haha. So, I best get started!

This is a cake I designed, made and decorated for a launch event for a new record label called Greyhound Records (You can search for them on Facebook in you're interested, there under Business I think, not the band one)

It took quite some time to do this even though it doesn't look like it, as things kept getting changed all the time as soon as I had sorted things out. But it all got sorted out in the end. 

I baked three different flavours of 12" cakes, on the left was Captain Morgan's Rum, the middle was plain and then the right side was Malibu Rum. As I said I baked three different  12" cakes, then cut them all up into thirds each. There was spare cake but only a little. I then stuck all the pieces together and then put fresh cream and strawberry jam in the middle. 

I bought some pre-made black fondant icing, though I bought two blocks of it and ended up having to nip to the store on the day the cake had to be finished and grab another block of icing as I didn't have enough! Needed an extra pair of hands to help me lift and carefully place over the cake, thank you to Mr. Burrows. Who is in the photo holding the cake for me. 


The writing on the cake went well, and I did it ever so straight which I was surprised at, since I thought it would go slanted but it didn't! And the dog! Oh my god, that took some re-thinking and time but had to use a smaller icing tube as the one i used for the writing wouldn't of done it, as it was too big. Was really stressful doing the writing and dog part through, Jesus haha. 

Was okay in the end though. I can't remember how many it served to be fair, which I should of done but I know the slices we're small. I would guess it served about 45 people, So I didn't think that was bad. Still had a small bit left, but most of it went down well! Really glad! and even got an order from it :D 

All in all I really enjoyed it and the Launch event went down smashing! They even had pizza for £3.50 a full one too! Was very yummy! ;) I loved the look of it in the end, just plain and simple yet professional in a way. Hope you liked having a look, more cakes to come soon! 

- Emma